Contents
- Build your own grow box
- Build your own quantum board
- LED Grow Lights Distance
- Can you grow auto flowers with LEDs ?
- Can you top auto-flowers?
- Your Guide to the Perpetual Harvest
Build your own grow box.
So, you have decided to grow your own cannabis at home. Nice one! Growing your own cannabis not only guarantees a continuous supply of wonderful weed, it also leads to a greater appreciation of the herb and the sense of a job well done. It is well documented that time in the garden is as beneficial as meditating, increasing one’s sense of well-being and even helping combat anxiety and depression.
Growing cannabis at home means having somewhere dedicated to growing. To produce enough weed to last from harvest to harvest, a minimum of 1m² is recommended. This will accommodate a number of smaller plants or one or two well-trained, or even scrogged, larger plants. All this is up to you; the yields in the end are similar, it just depends on whether you want a lot of variety with smaller yields per plant, or less variety and larger yields per plant. It is entirely up to the individual.
The height of the grow room is dictated by available space and lights being used. A single square metre is easily covered by most styles of grow light. Less height is required when using fluorescents, as lights can be kept closer to plants throughout the grow, whereas HID lights need more distance to avoid light burn and excessive heat buildup. You might want to blast your babies with a 1000W HID, but without appropriate height, this just isn’t possible.
SELECTING A SPACE
Everyone can find an easily accessible spare square metre somewhere in their home or apartment. Spare rooms, attics, basements, cupboards, and walk-in robes can be used to set up a grow space. Discretion is a key factor; fan noise, light buzz, and odour control each need to be considered when selecting a space to set up a grow room. An oscillating fan attached to a shared partition wall, for example, will drive your neighbours crazy with the noise and sympathetic vibrations.
continue the article here >>> royalqueenseeds – building-your-own-grow-room
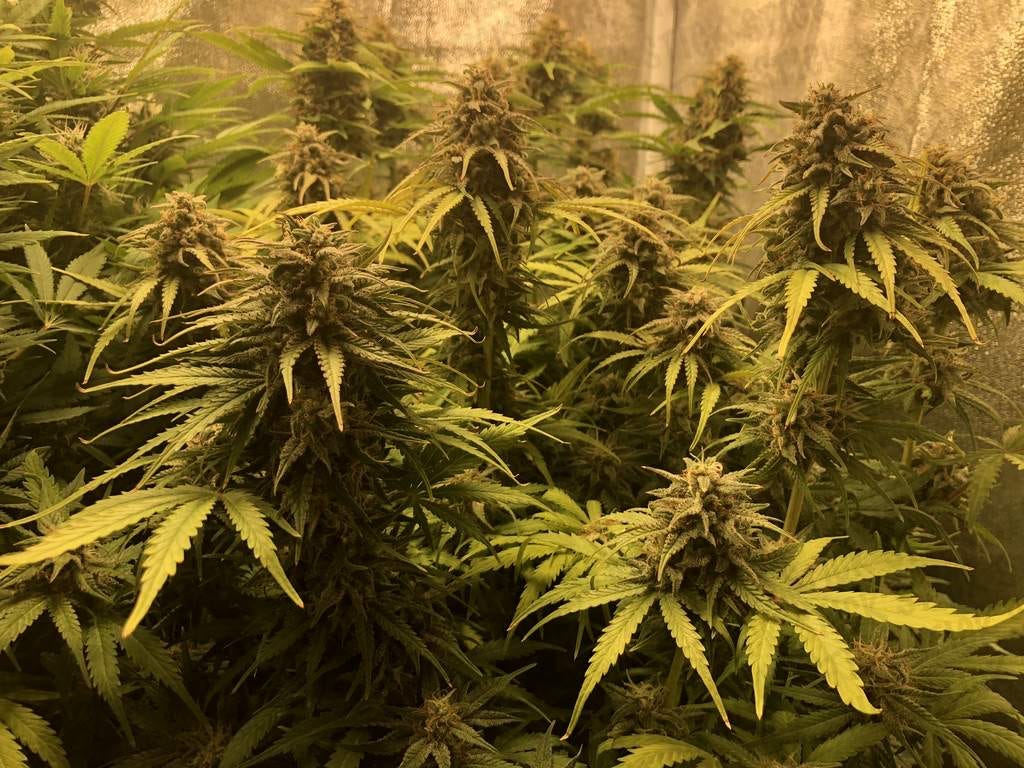
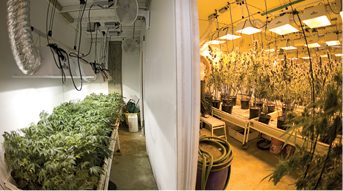
Below is a image of a clients growbox they built another_brother420, 2x4ft with the QBS2000


Happy Building
LED Grow Light Team
Build your own Quantum Board (light unit/fixture).
DIY 130 W LED LIGHT FEAT. THE CRESCIENCE FLUXENGINE
article taken from homegrow-pro.com
This article will cover how to build a solderless LED light thats scalable and very easy to set up. Check out why LEDs are superior.
The build shown here is beginner friendly. You dont have to drill into metal and the boards do not need active or passive cooling, since the framing will be sufficient to do that. If youre more into COBs, check out my 310W COB growlight guide!
This article will cover how to build a solderless LED light thats scalable and very easy to set up. Read more about how LEDs are superior.
Disclaimer: This piece of electronic is a potential fire hazard and should only be put together by electricians or persons with similar know-how. Please refrain from putting in self-made electronics into the wallplug. Dont die!
LED Grow Lights Distance for Cannabis & Other Plants

this article is taken straight from the bios lighting website.
article herehttps://bioslighting.com/led-grow-light-distance-chart/
Today, more growers are moving away from traditional HID and fluorescent T5 grow lights and are installing LED lighting. LEDs emit less heat than HID sources which means that the proximity of LED grow lights to the canopy varies from that of traditional grow lights. It is important to also understand how optimal grow light distance impacts the different phases of plant growth.
This article outlines the different lighting needs for a variety of plants, (including cannabis) according to their growth stage. It also addresses how to determine the proper distance of LED lighting from the plant canopy to nourish plant growth, as well as the importance of PPFD (PAR), and other popular grow light terminology.
How To Measure Light for Plants
Let’s quickly define PAR and PPFD. PAR (Photosynthetically Active Radiation) describes the portion of the visible spectrum that plants “see” and use for photosynthesis (400nm-700nm). PPFD (Photosynthetic Photon Flux Density) measures the amount of light (PAR) a plant receives over time. PPFD represents the light density a plant receives over time and is measured in micromoles [of photons] per square meter per second (1).
A way to visualize PPFD is to imagine the sun is “pouring” light onto the plant leaves. As the sun pours light onto the plants, their leaves are collecting the energy. PPFD is the measurement of the amount of light (photons) the sun “pours” onto the plants over time. PPFD is an important metric because it helps growers accurately measure the light intensity for photosynthesis at the canopy level. It is also important because lights placed too close to the canopy can cause burning, bleaching, stunted growth, or discoloration.
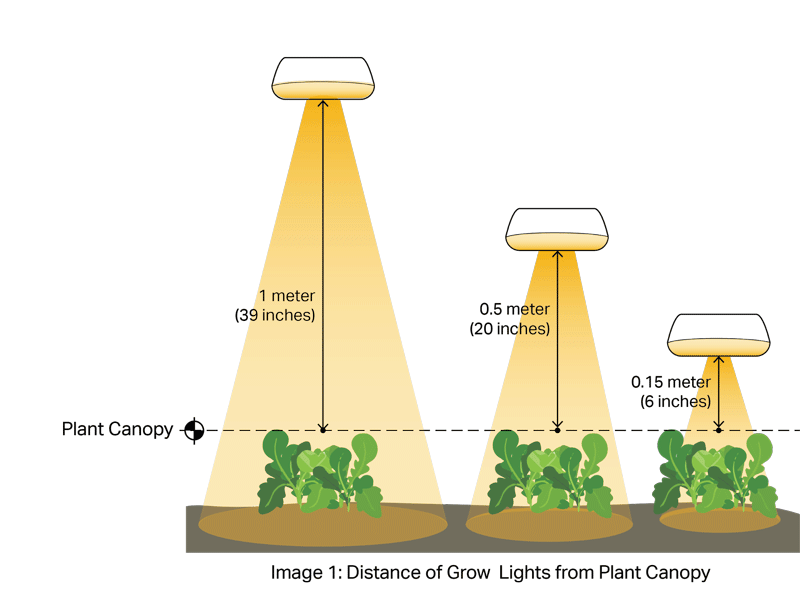
| Distance from Plant Canopy(meters / inches) | Intensity (Lux) | PPFD / PAR(μmol/m-2/s-1) | Coverage or “Light Footprint”(m² / ft2)* |
| 2m / 79 inches | 955lx | 670 | 7.6m2 / 81.8ft2 |
| 1.5m / 59 inches | 1692lx | 1170 | 5.0 m2 / 53.8ft2 |
| 1m / 39 inches | 3663lx | 1670 | 3.0 m2 / 32.3ft2 |
| 0.5m / 20 inches | 12,500lx | 2170 | 1.5 m2 / 16.1ft2 |
| 0.2m / 8 inches | 50,300lx | 2670 | 0.5 m2 / 5.4ft2 |
* Coverage will vary based on the grow light being used. LED source shown here does not use a reflector to direct the light
Table 1: Distance of LED Lighting from Plant Canopy (600W LED Grow Light)
Table 1 shows how a 600W LED grow light performs at varying distances from the plant canopy. It outlines light intensity (lux), delivers PPFD (μmol/m-2/s-1 or micromoles per square meter per second), and also shows the “light footprint” or canopy coverage. Intensity, PPFD/ PAR, and “light footprint” all change as the distance of the light from the plant canopy increases or decreases.
Table 1 also highlights how changing the distance of the same 600 watt LED light changes the light intensity and “light footprint” or canopy coverage a plant receives. As the light source is located closer to the canopy, the light intensity increases. In general, grow lights should be mounted closer to the plant canopy for vegetative stages of growth and higher up (further away from) the plant canopy during the flowering stages of growth.
Where Should Grow Lights Be Located?
For seedlings, LED grow lights should generally be mounted between 24-36 inches above the plant canopy – however, this depends on the power (wattage) of the light source. Locate your LED grow lights at the furthest distance from the seedlings (~36”) – this keeps heat and light intensity levels lower and helps prevent seedlings from drying out. Once roots have been established and sprouting has started, the lights can be moved closer (usually within the first 2-3 weeks).
In the vegetative stage, LED grow lights should be between 12-24 inches away from the top of the canopy. During this stage, more light is needed for photosynthesis, so the light source should be located closer to the plants.
As the plants progress through the flowering stage, their demand for intense light decreases. The top leaves of the canopy should be between 18-24 inches from the light source to produce flowers. It is at this stage that the plants increase in height and grow fruit. Depending on lights and how you want your crop to grow, it is not necessary to change the height of the lights during flowering, especially if you do not want taller plants.
How Far Should LED Grow Lights be from Seedlings?
At the very early stages of growth, seedlings are delicate and require less light intensity. This means you do not want to turn up the intensity too early as the seedlings will thrive with a far gentler approach. Depending on the size of the light, it is safe to keep grow lights located somewhere between 24-36 inches from the top of the soil.
How Far LED Grow Lights Should be From Clones
Cannabis cloning is a process where clippings or cuttings from a mature plant are used to grow another plant of the same kind. The LED grow light distance above the clones differs from the height required for seedlings. With clones, they will need intense light to begin. Depending on the power of the light and maturity of the plants, this could vary quite a bit between 14-36 inches from the top of the plant canopy.
How Far Should LED Grow Lights be for Flowering Plants
As plants grow, their needs change. Once the vegetative stage is complete, plants enter the bloom or “flowering” stage. For established plants, they are already where they need to be in order to thrive. During the flowering stage LED Grow lights should be located between 16-36 inches from the plant canopy. Moving the grow light closer will increase the light intensity which can maximize photosynthesis. However, if the grow lights are too close above plants, they can cause wider, more sprawling growth or can even damage the plant.
What about Other Stages of Growth? (H2)
Plants require different levels of light depending on each stage of growth. To understand exactly how far grow lights should be from plants, it is important to factor in the different stages of growth (2). It is also important to consider the power output of the grow light — this usually is related to the wattage of the light source, which is a primary factor in determining the optimal distance for LEDs when starting the growing process.
Plant growth can roughly be divided into three different stages – Seedling, Vegetative, and Flowering stages.
This means once healthy roots are firmly established, it’s time to increase the intensity and lower the lights.
Seedling Stage
During the initial stage as seedlings, LED grow lights should be placed higher up from the plants to avoid drying out the soil.
Some growers may be tempted to blast seedlings with a high-intensity light to promote faster growth, however, this will not help until the plants become established. Seedlings are too vulnerable in this early stage and require a gentler approach. Once plants mature, then higher light intensity is required to promote photosynthesis.
Vegetative Stage
During the vegetative stages, plants respond well to intense light – it is during this period that they are maturing and using photosynthesis to grow quickly. To increase the light intensity, LED grow lights should be located closer to the plant canopy. Strong, healthy stems and roots are key for a successful and repeatable yield.
While increasing light intensity promotes growth in the vegetative stage, it is important to closely monitor your plants, making sure to look out for adverse symptoms caused by too much light or not enough.
Flowering Stage
Flowering is the final stage of a plant’s growth cycle — during this time fruit production and stem growth accelerate. As plant growth transitions from the vegetative to the flowering or bloom stage, it is good practice to “phase” this transition process. To do this, gradually raise the height of the LED grow lights away from the plant canopy (using the height recommendations outlined earlier). Monitor the distance closely, keeping in mind the desired crop height and flowering needs for the specific plant/crop.
Adverse Effects of Too Much Light
When a plant like cannabis receives too much light at any stage, they often show symptoms of distress. Since LEDs do not give off much heat, the main issue that needs to be closely monitored is any indication of “light burn”. Other side-effects related to grow lights that have been placed too closely to the plant canopy could be discoloration or stunted/irregular growth. Both of which must be identified quickly and the grow light height adjusted accordingly.
Signs of light burn in cannabis plants include upward-pointing leaves and what is known as “bleaching”. Bleaching is the white or yellow discoloration on the leaves closest to the light. Light burn can also be identified when the plant veins stain green as the rest of the leaves turn yellow.
Grow Light Distance – Cannabis vs. Other Plants
Using LED grow lights for cannabis production has become more popular as growers have moved crop production indoors. LED has also provided a benefit to growers because they can utilize specific light spectra to provide more targeted lighting conditions for different crops. Additional benefits when considering LED grow lights include lower power consumption, reduced forward heat, and increased yield over a shorter period of time as compared to traditional sources.
Grow light distance should reflect growers’ desired height and uniformity of their plants, with a nice spread of leaves and healthy flowers. If we look at the crop needs for salad greens or lettuce compared to cannabis, we see that salad greens and lettuce are suited to short, wider growth, whereas cannabis is more suited to taller, narrower growth.
Regardless of your crop type, farmers and cannabis growers alike want maximum-quality yields over a shorter growth cycle.
Lighting Distance for Traditional Grow Lights
Before LEDs became popular for indoor growing applications, traditional High Intensity Discharge lamps (HID) like High Pressure Sodium (HPS) and metal halide, as well as fluorescent lamps, were widely used. These lamps historically have had a much lower first-cost than LED grow lights, making them more affordable to purchase and therefore accessible for large-scale indoor growers.
The distance that HID or fluorescent grow lights should be from the plant canopy is greater than from LED. This is partially because they give off more forward heat than LEDs, but they also are only available in a few different wattages/light outputs. The distance that grow lights should be mounted varies for each stage of growth and depends on the wattage of grow lights used.
While traditional grow lights have a lower first cost (they are less expensive to buy) they require more maintenance over time – the bulbs need replacing and/or cleaning more frequently – and they have significant limitations related to lighting controls – many do not dim and can take a long time to turn on to full light output.
Fluorescent Grow Lights
There are three (3) basic types of fluorescent grow lights – T5, T12, and Compact Fluorescent Lamps. To achieve different light intensity, growers must adjust the height of the lamps from the plant canopy accordingly. One benefit to fluorescent is that it is very difficult to cause light burn because they don’t emit enough heat. Regardless, light intensity and heat should always be closely monitored.
For young crops, approximately 6-12 inches is a sensible height to begin since they need a higher intensity of light. As they mature from vegetative through flowering, it’s wise to double this distance to around 12-16 inches. As a general rule, when T5’s are used it’s wise to keep them as close as possible but to monitor overheating or drying out.
HID Grow Lights (Metal Halide and High Pressure Sodium – HPS)
Metal Halide (MH) lamps provide a large amount of blue light – the spectrum considered best for the vegetative stages of growth (3). High Pressure Sodium (HPS) lamps are ideal for both vegetative and flowering. Both of these produce significantly more heat than LEDs but are relatively inexpensive to buy.
One way you can test the heat of HIDs is with the back of your hand. This can help you gauge the right grow light distance. Simply place your hand just over the top of the canopy and hold it there for 30 seconds. Your hand should become hot, but not unbearable. If this happens, increase the grow light distance above the plants.
Many commercial growers use 1000W HID lighting, which normally would see a height of 19-26 inches used to begin. From here, they can gradually be moved closer.
However, since HIDs produce a large amount of heat it’s critical to avoid heat burn since this will damage any plant. Plus, indoor ventilation is very important with HID lamps due to the higher heat they give out.
With 50 years of collective experience and expertise, BIOS Plant is a leader in LED grow lighting solutions and continues to innovate and push the industry forward. BIOS biology-first and research-based approach to LED grow lights are led by nature as we build brilliant full spectrum LEDs so plants grow stronger and yield more – from seedlings to maturity.
With a 50% reduction in electricity consumption and up to 50% less heat produced compared with HPS, our SSL grow lights provide your plants with natural light for up to ten years. The BIOS Icarus® line of LEDs provide optimized light spectrums for superior results which also use plug and play configuration. Our grow lights are easy to set up with effortless maintenance, backed by our ongoing commitment to support our partners’ LED integration.
- Park, Y., & Runkle, E. S. (2018). Spectral effects of light-emitting diodes on plant growth, visual color quality, and photosynthetic photon efficacy: White versus blue plus red radiation. PloS one, 13(8), e0202386. <https://doi.org/10.1371/journal.pone.0202386>
- Niinemets, U., & Keenan, T. F. (2012). Measures of light in studies on light-driven plant plasticity in artificial environments. Frontiers in plant science, 3, 156. <https://doi.org/10.3389/fpls.2012.00156>
- Pennisi, G., Orsini, F., Blasioli, S., Cellini, A., Crepaldi, A., Braschi, I., Spinelli, F., Nicola, S., Fernandez, J. A., Stanghellini, C., Gianquinto, G., & Marcelis, L. (2019). Resource use efficiency of indoor lettuce (Lactuca sativa L.) cultivation as affected by red:blue ratio provided by LED lighting. Scientific reports, 9(1), 14127. <https://doi.org/10.1038/s41598-019-50783-z>
this article is taken straight from the bios lighting website.
article herehttps://bioslighting.com/led-grow-light-distance-chart/
Can You Grow Autoflowers with LEDs
LEDs have come a long way since they were first introduced. A technology once considered low-tech is now praised by indoor growers all over. But, can you grow autoflowers with LEDs? Find out how, in this article.
Enzo Schillaci 28 August 2020
Contents:
- 1.Can you grow autoflowers with leds?
- 2.What are led lights?
- 2. a.Types of leds
- 3.The advantages of using led lights
- 4.The disadvantages of using leds
- 5.How to grow autoflowers with leds
- 6.Things to keep in mind when growing autoflowers with leds
- 7.In conclusion
Even as a beginner, you’ve probably heard of LEDs. LEDs were introduced just a few years ago, and growers wouldn’t even consider growing marijuana plants because they weren’t as good as other high-intensity lights in the market. However, just like people changed their minds regarding autoflowers, LEDs managed to turn around and produce great yields.
Autoflowers are easy to grow, despite what you’ve been told. They adjust to any growing condition as long as it isn’t extreme. Similarly, they will grow no matter what light you use, but obviously, stronger lights equate to stronger plants, better quality, and higher yields.
1. Can you grow autoflowers with LEDs?
This article is taken from 420 Fastbuds :
https://2fast4buds.com/news/Can-You-Grow-Autoflowers-with-LEDsFastbuds
Yes, of course, you can! In fact, you can grow any type of plant using LEDs without any issues. They last for a long, long time with some lights continuing for more than 50,000 to 100,000 hours!
Even though LEDs are different from bulbs, both of them fit the same purpose when talking about Cannabis. Obviously they have their differences but are used to grow autos and photos alike, some growers even mix LEDs and light bulbs in the same tent with great results.
Here’s a quick example of how your autoflowers might fare under LED lights:
https://growdiaries.com/video/2680164
As you can see, the color combination ends up looking white, that’s what you should look when buying LEDs. The plants are super healthy, the buds are quite dense and the plant is strong, that’s what you can expect when using good-quality LED fixtures.
2. What are LED Lights?
LEDs have been around for a while but only recently their popularity has increased, as technology advances, LEDs have been developed for other uses, and growers have benefited from that. But what exactly are LEDs?
LEDs – Light Emitting Diodes – are lights that can be used to grow almost any type of plant. Technically speaking, it contains two semiconductors – electrons and holes. While electrons are negatively charged, the holes are positive. When an electric current is applied over the light, the two semiconductors collide with each other and release energy, otherwise known as photons.

How LEDs work.
This entire process is known as recombination. The LEDs introduced at the very beginning weren’t of any advantage to a grower since the light output was meager compared to other lights; however, with technology and years of research, many manufacturers now produce outstanding LEDs that almost mimic the sun’s full spectrum.
Types of LEDs
Standard purple LEDs
This were the first LED fixtures available and are still widely available today, and although they’re not the best you can still get good results with them for cheap. This type of LEDs is the cheapest out there but lacks in build quality, light quality and sometimes can result in lower yields. When growing with this type of LED, you can add complemental horizontal lighting with the proper led strip spacing or vertical lighting with light bulbs to provide good light to the lower part of the plants.
COB LEDs
Cob LEDs (aka chip on board) is a bit more expensive than standard lights but has a better penetration due to their intensity while being relatively efficient. The only drawback is that they don’t have a good coverage due to their format, so you’ll need a bit more to properly cover your growing space.
Spread or spider-style LEDs
These types of LEDs are the latest in LED light fixtures, due to their format they can cover a big area and are widely used in commercial operations due to their high efficiency and wide light spectrum. With this type of LED fixture, you’ll get the most gram per wattage and efficiency but can be extremely expensive.

Related storyIndoor lights for Cannabis grow: LED vs Bulbs
3. The advantages of using LED lights
When compared to bulbsfixtures, LEDs are a tad more expensive. Then why choose them? Well, LEDs may be a little more expensive than HPS or HID lights when you first purchase them, but the efficiency reduces cost in the long term, making LEDs certainly cheaper than maintaining HPS lights.
- Full-spectrum
The spectrum refers to a light source that covers the wavelengths that are useful to animal and plant life, from infrared to ultraviolet. Obviously, no artificial light can mimic the sun but when talking about a full-spectrum light it means that it emits the entire visible spectrum and the important qualities of natural light.

The visible spectrum.
Even though not all LEDs emit all the wavelengths, you can find full-spectrum LED fixtures that will surely make a difference in the quality of your harvest. Cannabis plants produce trichomes to protect the flowers from UV rays because that’s where the seeds will develop so if you’re growing with a good quality LED your plants will end up having more resinous and denser buds than with light bulbs.
- Less Heat
LED fixtures will emit less heat than bulbs while emitting the same light intensity and drawing less power, you can easily find LED fixtures that come with fans but usually, it’s not needed as long as you are dealing with good quality diodes, and have fans and an extractor properly working in your growing tent.

The advantages of using LEDs.
- More efficient
Due to LEDs being more efficient, they can produce an equivalent to light bulbs using less energy. LED fixtures use up to 75% less energy while producing the same or even more light intensity. As an approximate guideline, LEDs use 12w to emit an equivalent to a 50w bulb.
- More lifespan
LEDs have a lifespan of more than 50,000, some even reaching up to 100,000 which is way more than bulbs, this is due to the low temperature of most fixtures. Light bulbs emit a lot of heat which reduces their lifespan, this means that although bulbs are cheaper you will have to replace them more often so LEDs are cheaper in the long term.

Related storyBest Light Spectrum to Grow Autoflowers
4. The disadvantages of using LEDs
Light is vital in the photosynthesis process which is equal to food for cannabis plants, and it’s extremely important for autoflowering plants that have a short lifespan. Now that you know why LEDs are so awesome, you might be interested to know the disadvantages as well.
- Expensive
As mentioned already, the cost of LEDs is a bit more than other lights such as fluorescents, HPS, and MH lights. However, the LEDs that are being introduced now are so competitive that the prices have dropped down drastically.
The manufacturing market is saturated with too many LED manufacturers and it is indeed possible to purchase cheap LED lights. But, if you love big, thick buds then you have to go for the ones manufactured by brands that are a bit expensive.

The disadvantages of using LEDs.
- Not all companies provide a complete spectrum
Most companies provide a complete spectrum of light; however, it’s recommended that you do your research before purchasing lights because some companies aren’t very technologically advanced yet. If you do purchase an LED, make sure that it comes with all the colors required for your lovely autoflowering cannabis plants to grow.
- Directional light
Even though this has been fixed in newer fixtures, the light emitted by some LEDs is directional (like a flashlight), this means the area covered is less than when using bulbs, although manufacturers describe the coverage for vegetating and blooming plants so you will know everything you need to know before buying them.

The light LEDs emit is directional so it may cover less than some bulbs.
- Aging diodes
As time passes by LED diodes can start to change color, even though they can last more than 50,000 hours, they can fail or even burn.
If you invest a little more ina better quality you’ll avoid having to fix it for a long time, usually branded LEDs are made with good diodes which can last years and years without a problem.
Problems with individual diodes are more common with cheaper LEDs but if you can invest a little more and buy a good fixture it’s unlikely it will happen.
5. How to grow autoflowers with LEDs
A major advantage of using LEDs is that you don’t have to change the light to match the stages of the plant. For instance, the plant needs a lot of blue light in the vegetative phase and more red light in the flowering stage. In such stages, growers use MH lights and switch to HPS lights during flowering. Even if you use CFLs, “Cool Blue Daylight” lights are used specifically in the growing phase.

Some LEDs emit the whole spectrum of wavelengths so there’s no need to change the light fixture for each stage.
Since LEDs contain all the colors (full-spectrum), there’s no need to switch the lights between phases. But, remember that this is true only with certain lights because some LEDs being introduced now come with separate vegetative and flowering switches. No, you don’t have to switch to a different light, but you may have to manually control the switches.
Best LEDs for autos
There isn’t the best LED for autos, as longs as it’s a good quality fixture you’ll be fine. When buying an LED, remember that not all of them emit the whole spectrum so have that in mind, we also recommend you read all the information about it, like how much space they cover in the vegetative stage and in the flowering stage, check for the listed wattage and the actual wattage (which is how much they actually draw from the wall) and read a lot of reviews about it, this will help you decide on the best one for you.
Remember that LEDs are quite intense so when growing autos with them you should be careful, although autos aren’t affected by light toxicity as much as photoperiodic plants but ideally, you should grow in a lightproof space.
6. Things to keep in mind when growing autoflowers with LEDs
Light distance to plant
Growing seedlings with LEDs can be a little tricky. Seedlings are very fragile, and if the lights are too close, they tend to burn. Conversely, they grow tall and lanky if the lights are far away. So, the trick is to maintain the perfect distance between the plant and the light.

Keeping the light fixture at the right distance will provide the best growth.
This is why many growers use T5 fluorescent lights, CFLs, and MH lights to tend to seedlings. However, if you plan to use LEDs for the entire cycle, you need to be very careful at the beginning. For starters, read the manufacturer’s instructions carefully.
Most lights are placed at a distance of at least 18-22 in (46-56cm) away from seedlings, and you can do that too. Once you observe how the plants react, you’ll be able to judge the distance yourself. Autoflower seedlings need to be observed much more because the plants can get stunted if the tender leaves get burnt.
Watts per plant
Despite LEDs being more efficient, you still have to provide at least the minimum wattage needed for your plants to develop properly. If you don’t want to spend too much, you can get away with providing the minimum amount of LED watts (and the equivalent for bulbs) per plant as listed below.
- 1 plant – 18w (≡ 75w)
- 2 plant – 36w (≡ 150w)
- 4 plants – 72w (≡ 300w)
- 6 plants – 108w (≡ 450w)
- 8 plants – 180w (≡ 600w)
- 10 plants – 216w (≡ 750w)
When dealing with this, you need to have in mind that the listed wattage is not actually the power LEDs draw from the wall so we added the light bulb equivalent in case the manufacturer doesn’t provide the actual wattage.
Listed wattage vs actual wattage
Manufacturers usually claim their LEDs are 1000W or 2000W but that’s actually the LED equivalent to bulbs, when looking to buy an LED, you should also look at the actual power that light fixture draws from the wall, as said above, 12w is equivalent to a 50w bulb so by having that in mind, you can take a look at this chart to help you choose the one that’s suited for your growing space.
Wattage per Cannabis Plant
| Number of plants | LED (optimal) | Light Bulb (optimal) |
| 1 | 24w | 100w |
| 2 | 48w | 200w |
| 4 | 96w | 400w |
| 6 | 144w | 600w |
| 8 | 192w | 800w |
| 10 | 240w | 1000w |
Approximate wattage per cannabis plant.
By following this table you can properly provide the amount of light needed for your cannabis plants, flowering with the optimal wattage will result in healthier plants, better quality flowers, and a bigger yield.
Remember that this is an approximate and the amount of light may change according to your growing space, size of plants, and other factors.
Heat
Autoflowers have a lot of growing to do and they do it very fast. So fast that you’ll be on your toes to keep up with it. If you want the very best yields, you must be prepared to work for it. And talking about maintaining the plants, heat plays a major role.
Autoflowering cannabis plants thrive in environments where the temperature is neither too cold nor hot. If the temps exceed 35°C, the yields diminish quickly and the buds begin to burn too. Similarly, they cannot stand temperatures that go below 15°C.

LEDs with fans help aid you when controlling the heat in your growing tent.
Fortunately, you can play God when growing indoors and control the temperatures. But, it becomes easier if you plan it well. For instance, some lights like HIDs emit a lot of heat and the temperatures soar pretty quickly.
Even though it’s not that common, some LEDs exhibit similar tendencies and produce too much heat. Therefore, make your life easier by purchasing lights with inbuilt fans to reduce the heat.

Related storyAutoflowering Plant Heat Stress Symptoms
Use lights with better features
LEDs offer so many features that it can be mind-boggling. From dimming to power efficiency to a full spectrum, they appear to be the perfect companion to your autoflowering plants. However, while some companies offer all the features, they come with a price tag.

LEDs with better features give you an advantage when growing cannabis.
If you’re really interested in quality yields, though, look for lights that offer ‘dimming’ features. Some lights come with knobs that can be used to adjust the brightness of the light. For example, plants need less light during the vegetative phase and more light during the flowering phase so to save energy and money they can be dimmed. However, if you absolutely cannot afford such lights, it’s still okay because the plants will grow even if you don’t dim the lights.

Related storyHow Much Light Does A Grow Room Need?
Research, research, and more research
The only way to grow excellent plants is by choosing great lights. And you need to do a lot of research to buy lights that suit your setup. LEDs are available in various sizes and watts, and the differences in costs and features can be jaw-dropping. For instance, a branded 300W light can cost anywhere from $80 to $100, bigger brands offer the same at $350 but even newer ones can reach up to $1000 due to the research they’ve made and the money invested in making the best possible fixture they can.
Remember that not always the more expensive LEDs are better so make sure you research a lot before buying your light fixtures.
If you dig a little further, you’ll be surprised – nay, shocked – to find out that some brands offer 1000W lights for just $70 and others sell the same wattage LED for up to $1500! Amazing, eh? Obviously, there are differences in how the lights perform, and it’s up to you to figure out what your plants truly need.
7. In Conclusion
You don’t need the best lights in the market to grow good cannabis but if you want to stay updated with the latest technology and improve your harvests, LEDs are the way to go. Not only it will improve your harvest but will also consume less energy, making up for the initial investment in the long term. If you have changed from bulbs to LEDs and noticed a difference, feel free to share your experience in the comment section below!
This post was most recently updated on August 28, 2020.
Can you top auto-flowers?
Topping cannabis plants maximizes yields, but can you top autoflowers?
It’s a question many growers ask regardless of their experience growing cannabis plants because autoflowers grow a bit differently. And if you’re a beginner to growing autoflowering plants, you probably don’t even understand what topping is, which compels us to answer the question…
What is meant by topping cannabis plants?
Over the years, growers have come up with several methods to extract more yields from cannabis plants. From bending the stems to breaking them (yes, really!) in order to help the plants grow healthier, innovative growers have shown how to grow some kickass cannabis.
Cannabis plants, especially autoflowers tend to grow in such a way that the main stem overpowers the rest of the plant. The main cola packs all the buds while the remaining parts show little yields. Since the main stem gets most of the sunlight, it naturally grows bigger and taller and the plant focuses all of its energy on one stem.
However, what if you could create several colas? It would most certainly ensure that the yields are bigger, right? Most training techniques were invented due to necessity, and topping, like other methods, was used to increase yields.
Topping is an approach used to train cannabis plants. It involves cutting off the tip of the main stem to force it to develop several colas rather than one main cola. Once the plant develops a few nodes, the very tip is cut off so that the main stem has two colas. Topping can be used with other methods such as FIMming and LST, but the plant benefits even if you just top it and leave it alone.
When you “Top” the main cola, the dominance of that particular cola diminishes, and since the new colas are present beneath the main cola already, they begin to grow once they are exposed to more light. As the plant produces more colas, they can be cut again to repeat the cycle. Remember that it must be done only during the vegetative stage.
The very thought of increasing colas get you excited, and growers have topped their plants to get monster yields over the years, but will it work with autoflowers too? When the top of the main stem is snipped away, it shocks the plant a bit, and it needs some time to recover.
With photoperiod plants, you have all the time in the world, so it’s doesn’t matter if the plant takes a day or two to stop sulking and grow. However, with autoflowers, it’s a little different because they complete their life cycle in just 10–11 weeks. If the plant goes into shock and gets stunted, you get little to no yields, so what gives?
Is it worth it to top autoflowering plants?
Short answer — it depends.
Long answer — Well, bear with me for a few minutes.
Topping stresses the plant a bit, and since every single day matters for autoflowers, it’s truly a tough decision for several growers. Topping is usually done when the plant is still in the vegetative stage because most plants are finicky in the flowering phase.
Autoflowers begin flowering automatically when they are almost 3–4 weeks, so topping certainly seems out of the question. With photoperiod plants, one can wait even if they are stressed because you have time, but if something goes wrong with autoflowers, they don’t have time to recover at all.
For instance, if you top an autoflower in the third week and something goes wrong, the plant may take a week to recover. However, considering that it will grow only for the next seven weeks, it won’t have time to grow to its maximum potential and produce great yields.
Autoflowers will make you proud even if you don’t top them. A single cola can give you large yields, which is why many growers try to stay away from topping. Debates on whether you should top or not will continue forever, and it’s also a matter of preference.
With photoperiod plants, growers wait until the plant recovers because the schedule can be manipulated, but it’s not possible to alter the life cycle of autoflowers no matter what you do. As Indica autoflowers display tight internodal spacing, it’s definitely not a good idea to cut the tips off because the plant is genetically small and bushy.
However, Sativa plants — like the Tangie ‘Matic, for example — don’t mind the tops cut off because they grow tall and lanky. Basically, it all depends on how the plants grow. You can top even Indica plants such as the Blackberry because it develops several nodes, but if the plant is meant to grow horizontally rather than vertically, you’re better off leaving the plant alone.
That being said, many growers have proven that you can top autoflowers and still flaunt humungous yields. How is that possible? Well, it’s because of the experience. Don’t be naïve to think that they succeeded in their very first attempts. It takes a few grows under your belt to master the Topping technique, but once you get it, you’ll be glad you took the time to teach yourself.
So, yes, you can top autoflowers and get spectacular colas but you must understand how to do it in the first place.
How to top autoflowers?
The goal is to grow two colas, but care must be taken to not stunt them. Once the plant grows at least 3–4 nodes, you can either cut the top gently using scissors or pinch them off. Make sure that you do it in one swift motion, instead of cutting the top several times.
If you somehow miss cutting the top entirely but manage to cut only a few leaves, it’s alright because you’ve just performed another technique called “FIM”. FIMming — also known as “F**k I missed” — is a method that was discovered when a grower accidentally cut only the top leaves rather than removing it entirely.
Like topping, fimming also helps you grow more colas; however, fimming gives you slightly more colas compared to topping. Fimming doesn’t require you to remove the top completely, so you’re not stressing the plant as much as you would with topping. With less stress, the plant also recovers quickly, so fimming is more ideal.
You can try both fimming and topping on a single plant, but don’t overdo it because the plant can start flowering and things could go awry pretty quickly. It’s more than enough if you perform any of these techniques, but as you gain experience you’ll do it more confidently.
When to top autoflowering cannabis plants?
As mentioned already, there are a few things to consider if you want to Top or FIM autoflowering plants.
· Perform topping or fimming only on healthy autoflowers. And that’s because a plant that’s already struggling will not be able to recover from the stress quickly. With autos, speed matters, and if you’re not confident about the plant, it’s best to be happy with a single cola with good yields rather than multiple colas with negligible yields.
· Most training techniques are meant for experienced growers. As a beginner, it sure is tempting to try everything under the sun, and although it seems easy, try to hold back until you’ve harvested at least one batch of plants.
· Select autos that have a tendency to grow super quick. Topping must be done when the plant has 3–4 nodes, but since autoflowers begin flowering by the third or fourth week, the plant should display 4 nodes by the beginning of week 3.
· Try not to cut too much since stress can severely reduce the yields.
· Do not Top or FIM if the plant has been overwatered or under-watered. The same rule applies if the plant displays any deficiencies. Simply put, try these techniques only with healthy autos.
What other techniques can be tried with topping?
Topping works really well if you control the shape of the plant. The basic idea is to provide more light to the new shoots underneath, and they go on to become bigger colas. But, the results can be enhanced by supplementing one technique with another. And nothing works better with topping than LST.
LST is a short form for Low-Stress Training. This method requires you to the top the tip. Then you bend the colas to the side of the plant as they grow. This procedure helps the plant grow symmetrically. As the side branches are bent, a lot more light penetrates to the bottom of the plant, and even the buds that are more likely to become useless popcorn buds become fatter with the remaining colas.
The light is distributed evenly to the entire plant. Some growers use cable ties to bend the plant, and how you bend the plant is completely up to you; however, care must be taken to not snap the stem lest you want to kill the plant.
Of course, plants survive even when the stem breaks entirely, and there are specific training techniques dedicated to snapping stems, but that doesn’t apply to autoflowers. Autos grow fast if you provide the right conditions, so approach every training method with caution until you’re sure you can pull it off.
This article is taken directly from medium.com
Your Guide to the Perpetual Harvest
35 easy steps to help you master the symbiotic rotation process.
January 23, 2020
Kenneth Morrow
This excerpt from “Marijuana Horticulture Fundamentals: A Comprehensive Guide to Cannabis Cultivation and Hashish Production” (Green Candy Press), by Ken Morrow, has been reprinted (and edited for space) with permission. You may purchase the complete book at bit.ly/hortfundamentals.
Symbiotic rotation is essentially the practice of having all stages of your plants ready exactly when you need them. On the day of harvest, vegetative plants must be ready to install in the flowering room, and your clones must be ready to be moved to the vegetative room. After cleanup and decontamination, the clone room should be ready for more clones, taken from the plants in the flowering room. Empty space is a waste of time [and money].
For all practical purposes, you don’t want plants ready before or after they are needed, but exactly when you want them—thus creating a symbiotic rotation. Refining the variables is key. Catering to the plant’s every need is the first priority. Second is maximizing its full potential.
Choosing a Cultivar
Understanding the parameters and limitations of your chosen cultivar is also paramount. You must experiment and investigate all possibilities and options. All plants are different. Here we discuss the two basic cultivars and their strengths and weaknesses in regard to symbiotic rotation.
Cannabis Sativa
Cannabis sativa typically grows tall and lanky with long internodal spacing, creating long, airy buds. They grow too tall for most indoor situations and take far longer to finish flowering than cannabis indica; sativa can take 8 to 16-plus weeks to finish!
The symbiotic rotation style is more labor-intensive if you are growing cannabis sativa. It can be done, but you must skip a vegetative cycle, meaning your flowering sativa plants won’t be finished for (probably) 12 weeks or more, so you will have a quandary!
… The way to overcome this situation is to eliminate your vegetative plants after you’ve taken clones. Wait for clones to root, then install them in the vegetative room. By eliminating the previous vegetative cycle, you have allowed the slow-flowering sativa to finish flowering, but still have vegetative plants and clones ready exactly when you want them. Essentially, you are skipping a cycle to wait for the sativa to finish flowering.
Cannabis Indica
Cannabis indica and cannabis indica/sativa hybrids are perfect adaptations, and so adapt to a symbiotic rotation flawlessly. Starting from seed or clone, you will grow your plants to approximately 10 to 12 inches tall, depending
on your chosen genetics/cultivar and internodal length. The plants will have many branches available for clones. Strip the donor plants of all available clones and place donor plants in the flowering room. Clones can take from 7 to 21 days to root depending on environmental conditions and genetics/cultivar. Ideally, you want the plants to finish at approximately 24 to 36 inches tall, so you will induce flowering when plants are approximately 12 to 18 inches tall. So, if you take clones (which take 14 days) and you then vegetate for 14 days, you will have both ready before your other plants have finished flowering. This would create a problem.
Symbiotic Rotation Timeline
… In this scenario, the grower needs four rooms/chambers/areas: one for clones, one for vegetation, and two rotating flowering areas:
Area 1: Clone area
Area 2: Vegetative area
Area 3: Flowering area
Area 4: Flowering area
(Areas 3 and 4 are also used for vegetative growth and for producing more available clone material.) The rooms/chambers/areas can be … part of a room sectioned off. For simplicity’s sake, I’ll call them simply “areas.”
Step 1. Start with eight plants from the same cultivar. Grow plants to approximately 12 inches tall and completely strip off any clones. (This process can yield about six to eight clones per plant; about 48 to 56 total.) Allow 14 days to root each clone.
Step 2. After the clones have rooted thoroughly, 14 days later, install the rooted clones into the Area 2 vegetative areas with 18 hours of light.
Step 3. Seven days after installation of the clones, clean plants up. Remove all lower leaves and vegetation to allow the plants to concentrate all available energy into developing the next batch of available clones. Remove unhealthy leaves. Only healthy clone stock is left on the 6- to 8-inch plants.
Step 4. Twenty-two days later, again strip and remove all available clones and eliminate the donors. (This time, you could get up to 400 clones from 64 plants.) Fifty percent of these will later be eliminated; only the best are kept and installed into the vegetation area.
Step 5. Move the remaining half of the plants into the Area 2 vegetative room with 18 hours of light. Take only the best plants, and dispose of the other half. This ensures that you only grow the best plants.
Step 6. Clean off all the unhealthy leaves and unwanted lower branches, as in Step 3 above.
Step 7. Twelve days later, transfer vegetative plants to the stage three flowering areas. Put the best one-quarter of the best plants in each room. Keep the lights on at the 18-hour cycle. Dispose of the leftover half of the plants. (In one example, 50 plants were placed in each flowering room and 100 plants were discarded.)
Step 8. Two days later, turn flower area one into a 12/12 light cycle. Area 2 remains 18/6.
Step 9. Two days later, take clones from plants in Areas 1 and 2. The plants in Area 4 are topped (the tips taken off to prevent the plant from getting too tall) and only a few branches are left on them while the plants in flowering room 4 are allowed to finish flowering. Light schedules in Areas 1 and 2 remain the same (i.e., Area 1 at 12/12 light cycle and Area 2 at 18/6).
Step 10. Twenty-one days later, turn flowering Area 4 to a 12/12 light cycle.
Step 11. One day later, transfer rooted clones to Area 2.
Step 12. Vegetative plants in Area 2 should be grown to approximately 12 inches tall and … stripped of all available clones. … However, leave plenty of viable material to finish flowering.
Step 13. Eleven days later, turn the lights in Area 3 to 10 hours on/14 hours off and significantly lower the ammonium and nitrate nitrogen (nutrient) levels. Eliminate all ammonium nitrate by the end of the growth cycle. (This is the N in the NPK ratio, or the vegetative component in nutrients.)
Step 14. Six days later, clean up/strip Area 2 (the vegetative room). Remove the lower leaves and vegetation, as well as any unhealthy leaves and material unsuitable for clones, as in Step 3.
Step 15. Eight days later, harvest all plants from flowering Area 3; clean and decontaminate the room in preparation for re-installation.
Step 16. One day later, transfer Area 2 vegetative plants to the empty flowering area, changing the light schedule to 12/12. Transfer all Area 1 clones to the vegetative Area 2. All of this should be done only after a thorough cleaning and decontamination of all empty rooms and systems.
Step 17. Two days later, take the clones from flowering Area 3 that have been on 12/12 cycle for 2 days and place them in Area 1 for rooting.
Step 18. Fourteen days later, strip/clean up stage two vegetative room. Clean off any and all unwanted/unhealthy material, as in Step 3.
Step 19. Seven days later, harvest flowering room two, immediately clean and decontaminate the area in preparation for re-installation, and transfer stage two vegetative plants from Area 2 to flowering Area 4.
Step 20. One day later, transfer Area 1 clones to Area 2; turn light to a 12/12 cycle.

Step 21. Two days later, take clones from flowering Area 4.
Step 22. Eighteen days later, clean up/strip vegetative Area 2.
Step 23. Four days later, harvest flowering Area 1.
Step 24. Two days later, take clones from flowering Area 1
Step 25. Sixteen days later, clean up/strip vegetative Area 2 of any unwanted/unusable material.
Step 26. Six days later, harvest Area 4, transfer Area 2 vegetative to Area 4 flowering, and turn lights to 12/12.
Step 27. One day later, transfer Area 1 clones to Area 2 vegetative area.
Step 28. One day later, take clones from flowering Area 2.
Step 29. Twenty days later, clean up/strip Area 2 veg of unwanted/unusable material.
Step 30. Four days later, harvest flowering Area 3 and transfer area 2 vegetative to flowering Area 3, leaving the lights at 18/6.
Step 31. One day later, turn flowering Area 3’s light cycle to 12/12.
Step 32. Two days later, clean up/strip Area 2 vegetative of any unwanted/unusable material.
Step 33. Fourteen days later, clean up/strip Area 2.
Step 34. Seven days later, harvest flowering Area 4 and transfer Area 2 vegetative to flowering Area 4. Transfer Area 1 clones to Area 2 vegetative area.
Step 35. Two days later, take clones from Area 2. Repeat this scheduling process over and over again—it is cyclical.
Every step of this schedule was dictated by growing methodologies, environmental conditions and genetics. We used four different cultivars, all indica/sativa hybrids, yet each rooted at different times. Each had a different growth rate and pattern, and each finished/matured at slightly different rates.
All of these factors must be considered when creating a working symbiotic rotation. The same symbiotic rotation cycle can be used for three-room rotations or by using mother plants instead of constantly rotating clones and vegetative plants, but in my experience, the above schedule is much more efficient than any other method, period!
Kenneth Morrow has been writing cannabis-related articles and books for more than 20 years. He owns Trichome Technologies, a cannabis R&D company. Morrow also is an award-winning grower and breeder. Has made contributions to many of today’s extraction methodologies and holds multiple patents. He consults on all cannabis-related subjects. Find him on Facebook at: Trichome Technologies or Instagram: TrichomeTechnologies.